
Popsicle stick Picture Frames and Homemade Cards
 |

I found yet another super fun, easy and cute craft from Stephanie at Life as a Mommy. You can find Stephanie's instructions here for the popsicle picture frame that inspired the girls' Father's Day craft this year. We had a lot of fun with these and were able to make some changed to make them our own.
What we used:
- popsicle sticks (regular or colored)
- pom poms
- glitter glue
-regular glue (for pom poms)
-hot glue gun (for popsicle sticks)
-finger paint and paper (to make hand prints)
-4x6 picture of child (sized to fit)
-pipe cleaner (to hang frame)
As always, we take our time making crafts and do different parts for short time periods over several days. If you have an older child that can maintain her attention for longer, you could probably do this entire project in an afternoon. If you choose to break it up though you can really do the steps in any order you wish (with the exception of the final assembly stage, of course).
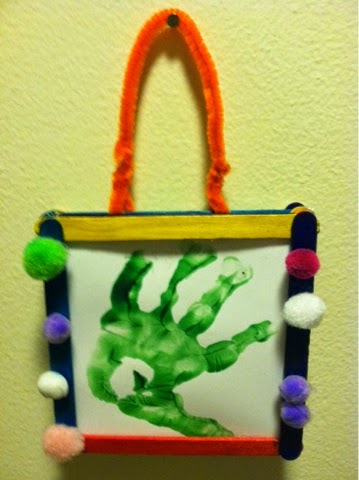
Day 1: Decorate the popsicle sticks that go on the outside of the frame.
 We glued colorful pom poms on some (as Stephanie did) and used glitter glue for some of the others. Because, really, glitter glue is still one of the best things, ever, to my 3 year old.
Day 2: Assemble the popsicle stick picture frames. 
I was intending on using regular popsicle sticks for this whole project but I didn't have enough. I went to the dollar store and all I could find were colored ones. It was a pack of 100 for $1 so I went with it. 
Day 3: Make finger paint hand prints.

Day 4: Complete the frames.

To place it, just weave the pipe cleaner in between two popsicle sticks. Take the short ends and twist them around the loop to complete.

We decided to use a picture in our frame too (instead of just a hand print). I always have extra photos laying around so I just found one of each child. I cut it to size and then glued it onto the frame. Glue the picture on all edges to make a shadow box frame. Next, take the hand print and glue it to the back of the picture. Finally, glue the decorated popsicle sticks on the outside of the frame.


I also found that when I laid the above 'your child's picture here' paper it slid easily in and out between the layer of popsicle stick so we could always add new pictures too.

These frames were a lot of fun but I don't think I would have been able to make more than two. We put together some homemade Father's Day cards to give to the grandfathers on Father's Day.
What you need:
- white card stock
-paint (washable preferred)
-paint brushes (optional)
-items to trace shapes (or you can just use your own talent)
-scissors
-glue stick
Day 1:

Paint some beautiful pictures with finger paint on white card stock. Allow to dry before moving on!
 Day 2: On the back of the painted picture make a bunch of different shapes. I want my circles to be even so I decided to fine an item to trace. I decided on a plastic medicine cup. I had planned to free hand the rest but I just don't have a good hand so I looked around for other shapes to trace. We decided on the blocks from the shape sorter and it worked quite well!
Next, I added some dash lines to help guide my little 3 year old as she cut around the shapes. I did the final cutting around the edges.


 I wrote on each card "Happy Father's Day" and the girls glued on the shapes. Again, my 1 year old is in the process of learning her shapes so we got a little undercover shape learning in during this activity.
We will plan to give out our crafts on Father's Day and also read this great book by Marianne Richmond:

It's a cute book if you are looking for something special for Dad.
I hope all the Dads out there have a wonderful Father's Day!


You can also subscribe by e-mail from the main page and have posts
delivered directly to your inbox!